First time with Infrared + Edit

JimFox

Moderator
Staff member
@Amy Nelson has been getting me excited for a while with he IR work, and I have wanted to help contribute to the IR forum. So I finally ordered a 720nm IR filter that screws on in front of the lens. I had a vague recollection from my old film days that IR filters were basically like sticking a 10 stop ND on your lens. So my 1/200th of a sec exposures without changing anything but screwing on the IR filter, my exposure became 30 secs and often having to go up 1 stop in ISO.

So I got the filter in on the weekend and took it with me to the Antelope Valley Poppy Field area. After the sunrise was over I decided to play with the IR for a while.

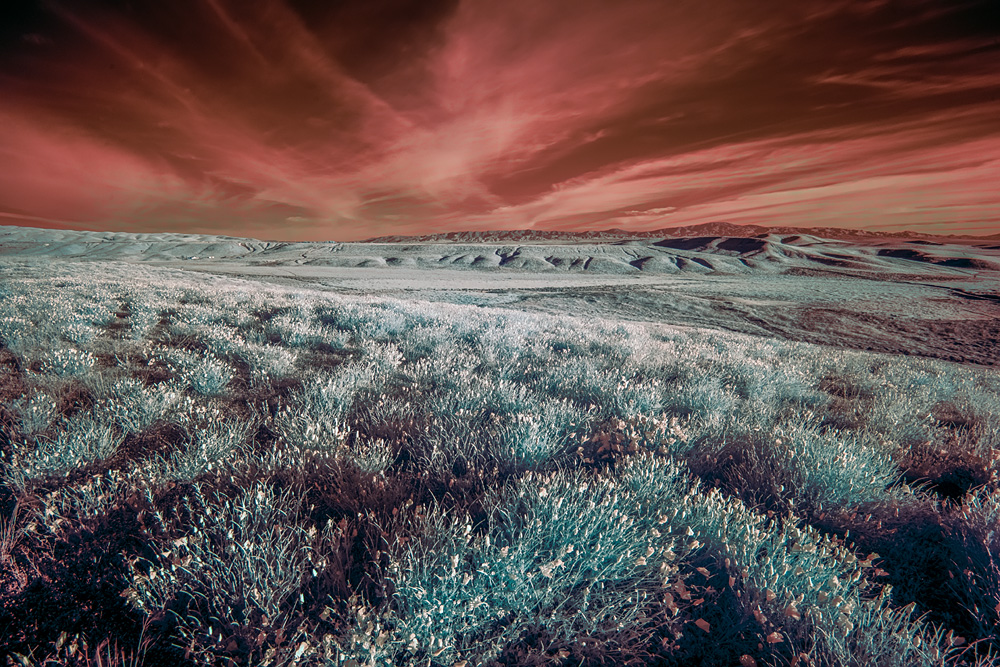
First off, the image is now red in color. White Balance changes are needed and other editing of channels and stuff. I tried looking up processing of IR photos with Photoshop, I found nothing. Just lot's of click bait that in the end didn't tell me a thing. So about all I could do was play around and see if I could come up with something that felt like IR. :) I did change the WB in camera to 2600k as that seemed right from what I had read.

If anyone has a tutorial that covers Photoshop instead of Lightroom, that would be awesome. :)

So I will post the normal view of what I shot, the IR view from in camera with a WB change to 2600k, and then my edits.

Please, all help would be awesome. If you want to download the IR out of the Camera and show what could be done, please help.

Jim


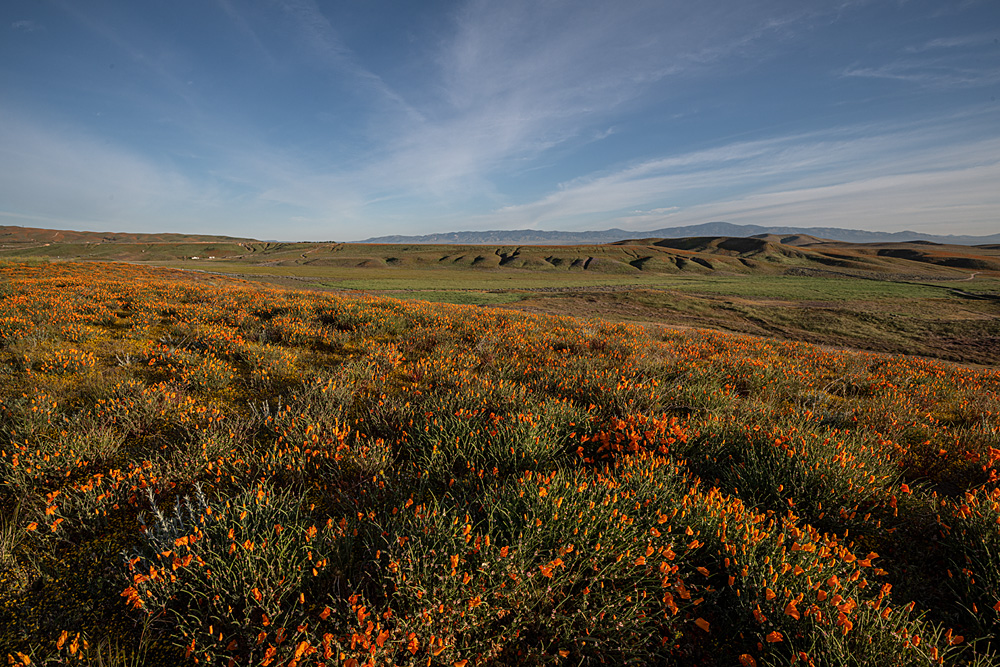
#1 Original - No IR Filter
(Straight out of the camera)
_D858109_Norm_dw.jpg


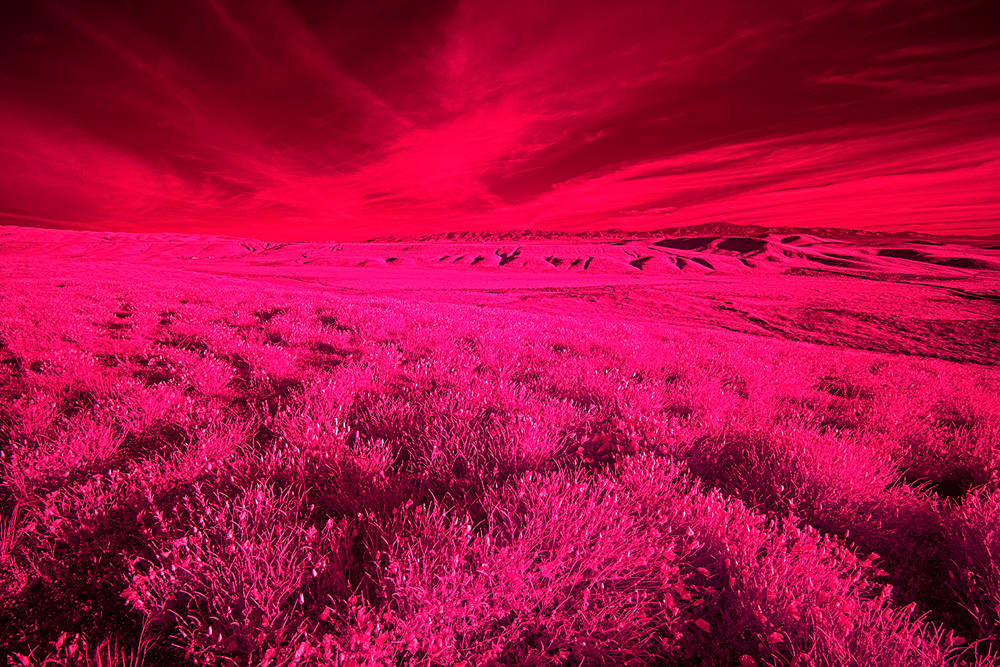
#2 - With IR 720nm Filter - WB changed in camera to 2600k
(Without the WB change it looked very similar just more Red all over and less Pink)
_D858108_IR_BW_dw.jpg


#3 - After my Playing around in Photoshop with no clue as to what I was doing. :)
_D858108_dw.jpg


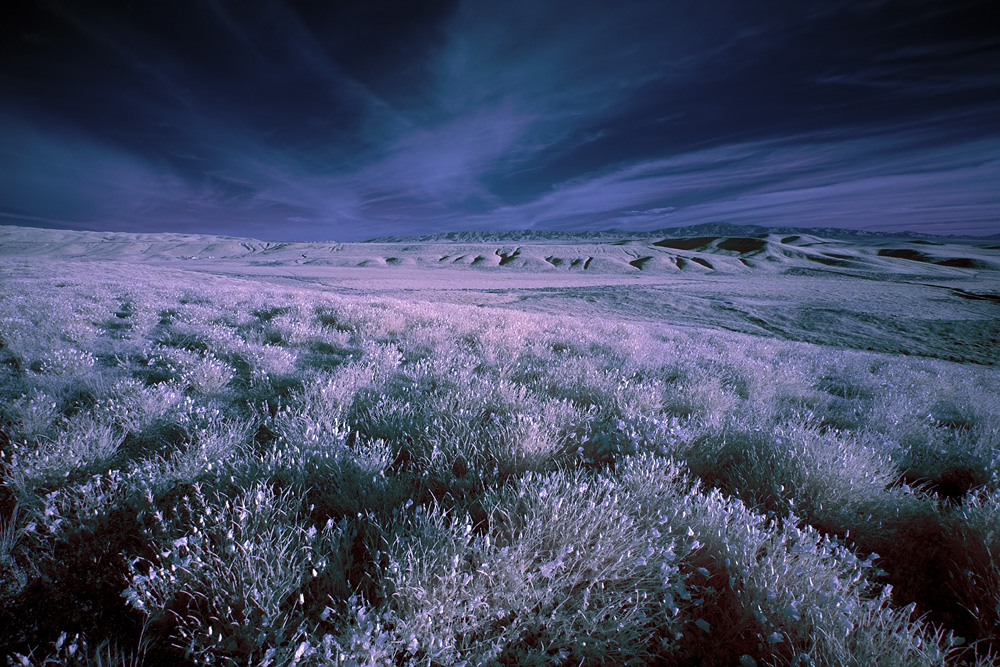
#4 - Added - A version with a Color Swap. Swapping the Red and Blue channels.
_D858108_a_ColorSwap_dw.jpg
 
Last edited:

AlanLichty

Moderator
Will the sensors in your camera actually pick up the IR wavelengths? I was under the impression we needed new sensors for that.
 

JimFox

Moderator
Staff member
Will the sensors in your camera actually pick up the IR wavelengths? I was under the impression we needed new sensors for that.
It's an IR filter that blocked below a certain frequency I think in our camera's. This filter restricts the light to just IR and at the wavelength it's designed for I believe. In this case it's 720nm. It's much like in the old days of putting an IR filter on a Film camera, only now with Photoshop or other editors we have lot's more control.
 

Amy Nelson

Well-Known Member
Looks like your surely on the right track.

Here are some steps to take to get you image to the creative processing in Photoshop:

1. Critical to get a proper white balance in camera. Do this by setting your custom white balance and using a gray paper (use one that is the same tone as the middle of the grayscale). Set this up in the lighting conditions that you intend on shooting in. (minimum 2600K) You can tweak the WB afterwards in Camera Raw by selecting the WB eye dropper and click from the upper top corner to the opposite bottom corner.
Test-Sample-1.jpg


2. You need to set up a DNG profile creation (for RAW editing)
  • Go to Adobe Download Editor and down load
  • Have to create it specific to the camera your using.
  • Open an image and just go to Save Option and save to what ever is easiest for you to find. Call it “IR Conversion a6300” or what ever the model of your camera is and save it as a .DNG file format (the rest of the screen should be standard ie. Format “Digital Negative”.
  • Open DNG Profile Editor -> then open your DNG image that you saved.
  • Go to Color Matrices and drop the White Balance Calibration all the way down to -100
  • Go to Town Curve and put a point at the center and in the input box type 126 and in the output box type 116. The will help keep you image at proper exposure even after the Color Matrices have been changed.
  • Go to Color Tables and make sure your Base Profile is set to Adobe Standard (*Camera Make* ILCE-*Model*, example Adobe Standard (Sony ILCE-6300).
  • Go to File --> Export Sony ILCE-? (6300) Profile – export to C:\YOUR USER NAME HERE\AADATA\ROAMING\ADOBE\CAMERA RAW\ CAMERAPROFILES (sugest calling the profile Sony a6300 Recipe.dcp) – using your camera model number.
  • If you go to Camera RAW or Light Room under and click on Profile Browser it will show up under “Profiles” ie..IR Conversion Sony a6300. Select the profile and close. Going back to basic development and adjust your image as needed. (at this point your image will go from pink/red to ugly yellow/blue)
Test-Sample-2.jpg

3. Red/Blue Channel Swap (can be done at RAW level with a LUT Profile).
  • Open in Photoshop
  • Go to Channel Mixer and:
  • Red Output Channel: change red to 0% and blue to +100%
  • Blue Output Channel: change red to +100% and blue to 0%
  • This is the traditional Red/Blue Color swap that gives you blue skies and yellowish foreground. ( you can save this in your Channel Mixer Presets)
  • Go to File - Export --> Export Color Look Up Table --> save as “RB Swap 1” (set Grid Points to 32 / Medium and Format check Cube. (save somewhere convenient) this creates a LUT you can use under Adjustments --> LUTS
  • You can create a XMP file to use in LR or ACR. (which is handy in you RAW adjustments)
  • You can do these same steps to make other flavors for Profiles in Raw processing. (I can explain this farther if interested, but just down have the time right now.)
Test-Sample-3.jpg

4. Creative Processing in Photoshop
  • Much like the standard processing as a normal image. (how ever you see the image in you minds eye)
Test-Sample-4.jpg
 

JimFox

Moderator
Staff member
This is a lot of work----much more than just processing an image in Lightroom and Photoshop. The results are really nice though.
Yep, trust me Doug... I was clueless. I pretty much thought I could just throw on an IR filter on the front of my lens and get IR photos like we see being posted. I had no idea the amount of work behind the scenes needed to make this happen.

Some of it, like setting up the special Profile for my camera and filter only needs to be done once. And I am guessing that once I get used to the routine, it may just be a 5 minute process. :)

I really appreciate @Amy Nelson taking the time here to help with this.

@Jim Peterson do you have any suggestions on this? Is there a typical look to the 720nm filter that I should be aiming for? Or can I still get the cool blue sky with the white leaves look with the 720nm filter?
 

beavens

Forum Helper
@JimFox You can get very creative by doing a selection of a color range in PS and then playing with that. Also keep in mind that you will be limited in how far you take an image with false color higher in the spectrum where 720 lies.

Check out the handy chart below for more info:

Capture.JPG


If you are really interested in false color IR I'd suggest looking at 590 or 665. 665 will give you a better mono conversion, as you can see how the blacks tend to lean towards midtones in the 590. Of course pushing in post will help your cause.

Jeff
 

JimFox

Moderator
Staff member
@Amy Nelson again, thanks so much for that tutorial. I know you really didn't have time to spare to do it, but it was a great help. I will post in a new thread the result of a different photo using those steps.
 

JimFox

Moderator
Staff member
@JimFox You can get very creative by doing a selection of a color range in PS and then playing with that. Also keep in mind that you will be limited in how far you take an image with false color higher in the spectrum where 720 lies.

Check out the handy chart below for more info:

View attachment 27748

If you are really interested in false color IR I'd suggest looking at 590 or 665. 665 will give you a better mono conversion, as you can see how the blacks tend to lean towards midtones in the 590. Of course pushing in post will help your cause.

Jeff
Thanks Jeff! That actually helps a lot to know my limitations with 720nm.
 

Jim Peterson

Well-Known Member
Hi Jim (Fox) et al -

Sorry I've been AWOL for a few days... been busy with some other stuff. But I'm baaaack now, and I agree with pretty much everything folks have posted on this thread so far. However, I also have a couple suggestions which should provide some additional simplification with in-camera capture and getting a usable white balance in postprocessing.

IR Image Capture. The method Jim F. used to capture his IR image can work, but in general it’s not the optimum way to get IR photos from a digital camera.

The reason for that is that all digital cameras come with a filter over their sensor that blocks IR wavelengths. Without such a filter, the IR light that the sensor naturally captures would mess up the colors in every image. The filter is required to make sure the camera captures the same colors your eye sees.

When you place an IR filter (one that selectively passes IR light but blocks visible light) over the camera’s lens, you then have two filters in the light path that are fighting each other. The net result is that very little light of any wavelength gets through, meaning that you typically will need exposure times measured in minutes. If the IR-passing filter on the lens is stronger than the IR-blocking filter on the sensor, you will indeed end up with an “IR” image (one where the exposure is mostly the result of IR wavelengths), but with such long exposures, any movement in your subject or scene will cause blurring, which you most likely don’t want.

Most folks who shoot digital IR images, therefore, go with a different solution. They get a camera converted to IR, meaning that the stock IR-blocking filter over the sensor is replaced with one that passes IR and blocks some or all visible wavelengths. With this arrangement, the sensor is (more or less) as sensitive to light as it was before, meaning that really long exposures are not needed.

The underlying sensor still has red, green, and blue photosites, however, and the IR-passing filter doesn’t completely block those wavelengths. So the sensor still produces some color information (how much depends, among other things, on the cutoff wavelength of the new filter over the sensor, as noted by @beavens above). This allows you to get color IR images.

White Balance Issues. The problem many folks encounter when they're new at processing raw images from a converted IR camera is that the default range for white balance adjustments in Adobe Camera Raw and Lightroom is not wide enough to get a good white balance with these images. It's unfortunate that Adobe has placed that limitation on the WB adjustment, but that's the way it is. I struggled with this for months after I started working with files from my newly converted IR camera years ago, until someone alerted me to a simple workaround.

With about 10-15 minutes of effort, you can create a custom WB profile to use in ACR or LR for your IR camera, install that profile on your computer, and then apply it ever afterwards when processing raw images from your IR camera. And when you apply your custom profile to an image, it greatly widens the range of the WB adjustment in ACR or Lightroom, giving you plenty of adjustment room to get the colors you want from your IR camera's raw files. Once you've installed the custom profile on your computer, it takes essentially no additional time to apply it to every IR image you subsequently process.

Here's what you need to do:

1. First, download the Adobe DNG Profile Editor for Windows here:

https://www.adobe.com/support/downloads/product.jsp?product=195&platform=Windows

...or for Mac here:

https://www.adobe.com/support/downloads/detail.jsp?ftpID=5493

2. Then, pick any raw image (it doesn't matter which one) from your IR camera and convert it to a DNG file (use Adobe's free dng converter for this).

3. Then, using that dng file, follow the instructions in this video for creating a custom WB profile for that camera:


NOTE: The instructor in the video says the technique is for Nikon cameras, but in fact it will work for any digital camera.

4. Once installed, that profile will then work for ANY raw image from that camera model (it doesn't have to be a dng image). Just apply the profile when processing the raw file via Adobe Camera Raw or Lightroom, and then use the usual sliders to adjust the WB, saturation, etc. to your heart’s content. It won’t take you any more time to do this than it does for images from a visible light camera. If you someday get a different model of IR camera, just repeat the process to create and install a new WB profile for that camera.

Hope that helps... and enjoy!
 

Jim Peterson

Well-Known Member
Here's one other point about WB that might be helpful...

I don't use the method @Amy Nelson uses (described above) for setting WB in my camera, for a very simple reason: my camera (a Nikon D3200 converted to IR with a 590nm filter installed) doesn't have enough range in its WB setting to provide a good WB for IR images. The best I can do is to set the WB manually in the camera to the lowest color temperature it allows. That makes the images look a bit better on the camera's LCD screen, but it otherwise makes no difference whatsoever. If you're shooting raw images, the camera's WB setting actually doesn't matter.

The reason is that if you're shooting raw, the camera's WB setting has no effect on the raw data the camera records. (The camera does record the WB setting you used in the image's metadata, but that has no effect on the raw image data that's recorded.) You can thus get the same results when processing the raw image regardless of how the camera's WB was set when the image was captured.

The above is NOT true for jpg images the camera records; those are adjusted according to the camera's WB settings at capture. But if you're shooting IR, it's really best by far to shoot raw and then adjust WB during raw conversion.
 

JimFox

Moderator
Staff member
Here's one other point about WB that might be helpful...

I don't use the method @Amy Nelson uses (described above) for setting WB in my camera, for a very simple reason: my camera (a Nikon D3200 converted to IR with a 590nm filter installed) doesn't have enough range in its WB setting to provide a good WB for IR images. The best I can do is to set the WB manually in the camera to the lowest color temperature it allows. That makes the images look a bit better on the camera's LCD screen, but it otherwise makes no difference whatsoever. If you're shooting raw images, the camera's WB setting actually doesn't matter.

The reason is that if you're shooting raw, the camera's WB setting has no effect on the raw data the camera records. (The camera does record the WB setting you used in the image's metadata, but that has no effect on the raw image data that's recorded.) You can thus get the same results when processing the raw image regardless of how the camera's WB was set when the image was captured.

The above is NOT true for jpg images the camera records; those are adjusted according to the camera's WB settings at capture. But if you're shooting IR, it's really best by far to shoot raw and then adjust WB during raw conversion.
Thanks so much Jim! More helpful information. I tested when I was shooting with the IR filter a few days ago and my manually lowering my WB to it's lowest level which was 2600k did help give the image a few more shades of red and it looked better.

But as you say, I am shooting Raw, so it technically doesn't matter as I can lower it easily enough in ACR when I pull it in for editing.

I know that ultimately getting a camera body converted to IR is the best way to go, but for $20 to get this IR filter I thought using it even though it's not ideal at least gets me started and gives me an idea as to what IR conversion I might want when that comes.

Thanks again!
 
Top Bottom