

Kyle Jones
Moderator
Although I primarily focus my efforts on still photography, I do sometimes take advantage of the video capture capabilities of my cameras to record video of the scenes I am shooting. Unfortunately, I had never been particularly happy with the video I recorded. I always set up my camera to take photos in the RAW format with the expectation that I will process the results on my computer to bring the image to life – carefully selecting parameters like the white balance, contrast, saturation, etc. My video editing tools were unable to provide the same functionality so I had pretty much written them off. Until I discovered that Photoshop, the same tool I used for processing my photographs, can edit video too!
With this guide I’ll step through the processing of a video I captured at Havasu Falls in Arizona, showing how to adjust the shadows/highlights, colors, contrast, and saturation in a non-destructive manner as well as adding some special effects like dodging/burning and even some glow. This isn’t the only way to edit video in Photoshop, but hopefully seeing how you can perform these functions will give you some ideas how you can adapt your workflow to video as well.
The first step is to open the video file in Photoshop. I just right-click on the file and select “open with Photoshop”. As you can see below, the file looks very flat. In the layers panel (on the right) you can see that the video has been opened as a layer in a Video Group. A video timeline is available at the bottom of the screen. A slider at the bottom of the timeline (circled in yellow) lets you zoom the timeline so it better fills the screen. This isn’t critical for editing a single clip like this, but it can help you see things a little better.

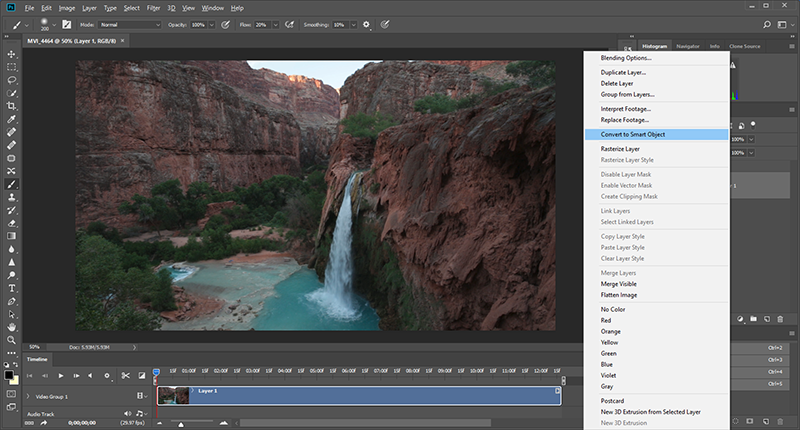
The first step is to turn the video into a smart object. This will allow me to apply a Camera RAW filter (not normally available as a layer) in a manner that allows me to go back and adjust the settings later. Right click on the layer name in the pallet and select “Convert to Smart Object”.
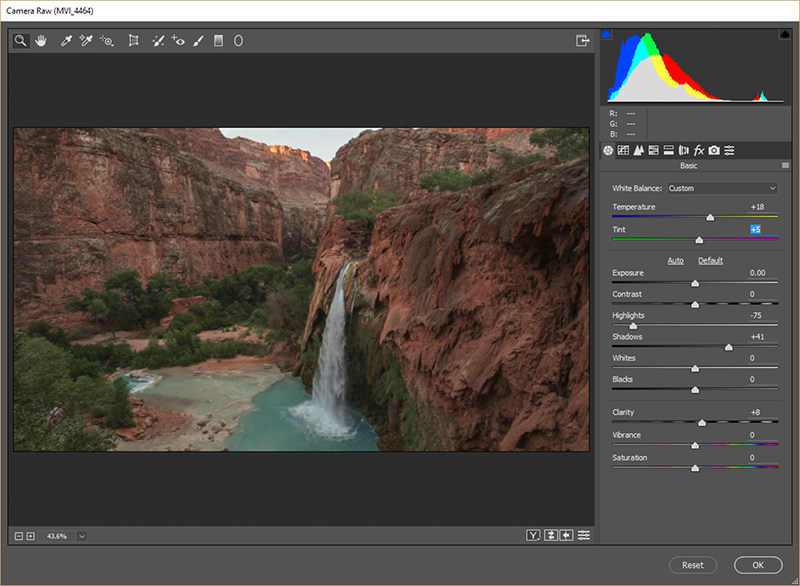
Now you can select Layer 1 and from the menu select “Filter ∙ Camera Raw Filter” to bring up the equivalent of the adjustments you can make in Lightroom or Camera Raw (see below). In this case I adjusted the temperature and tint sliders to warm the scene and remove some of the green tint. I also reduced the highlights to get some color back into the sky and boosted the shadows a little. Finally I added some clarity as this isn’t easily replicated by the other tools in Photoshop.
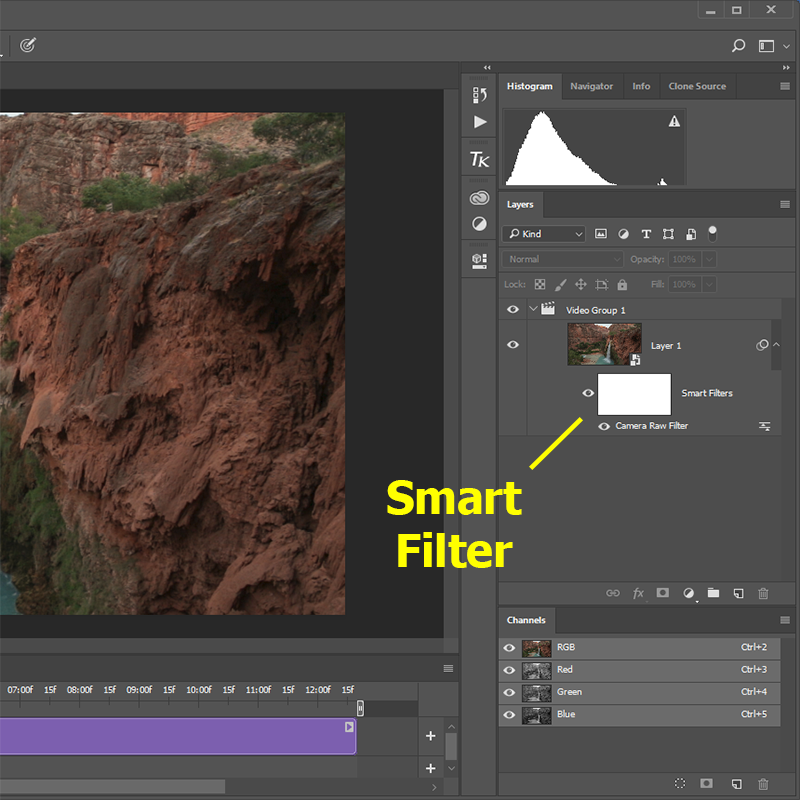
Once I click OK I can see that Photoshop added a Smart Filter to the video (see below). If I decide I want to tweak the results a little, I can just double click on the “Camera RAW Filter” label under the smart filter and it brings the RAW dialog back.
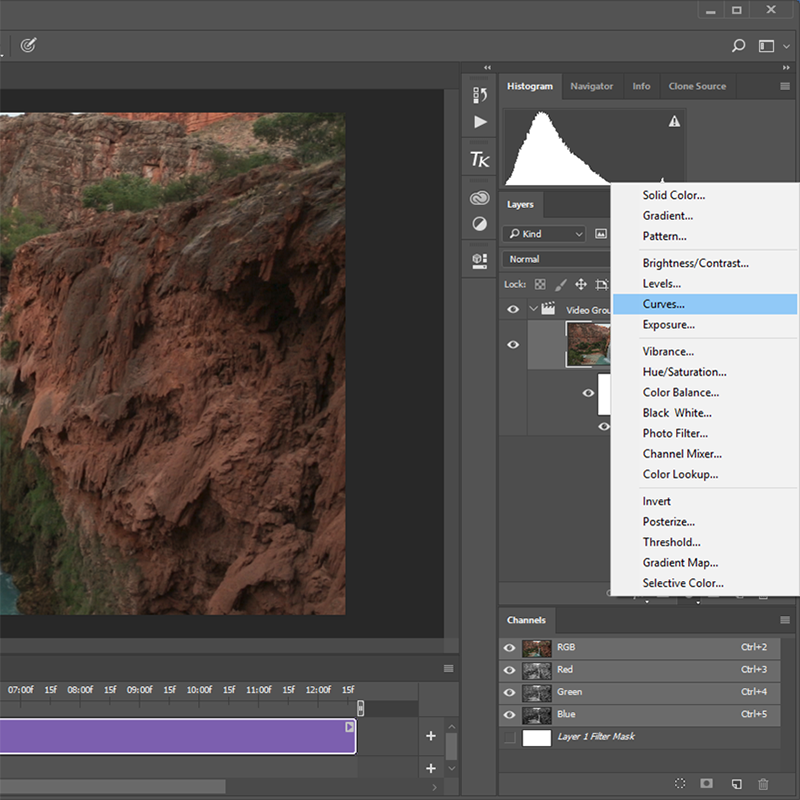
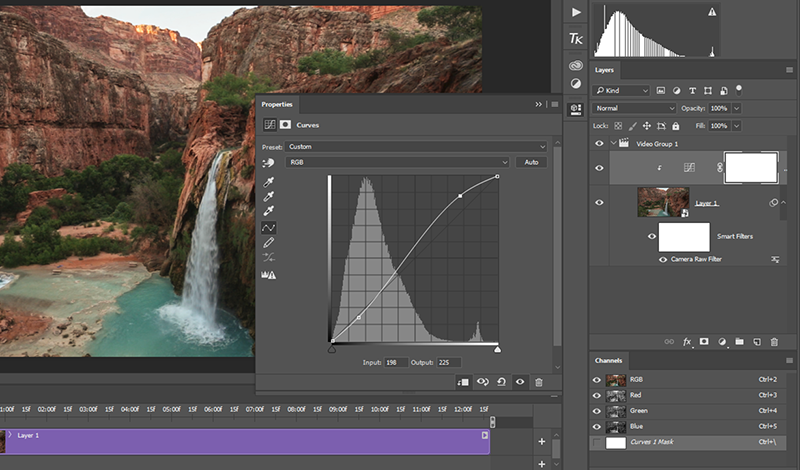
As this image is a little flat, the first thing I’ll do is add a curve for some contrast adjustment. First click on the “Layer 1” Layer and then you can click on the half white/grey circle below it to bring up the layer choices and select “Curves”.
I added an S-curve to give me the contrast I wanted.
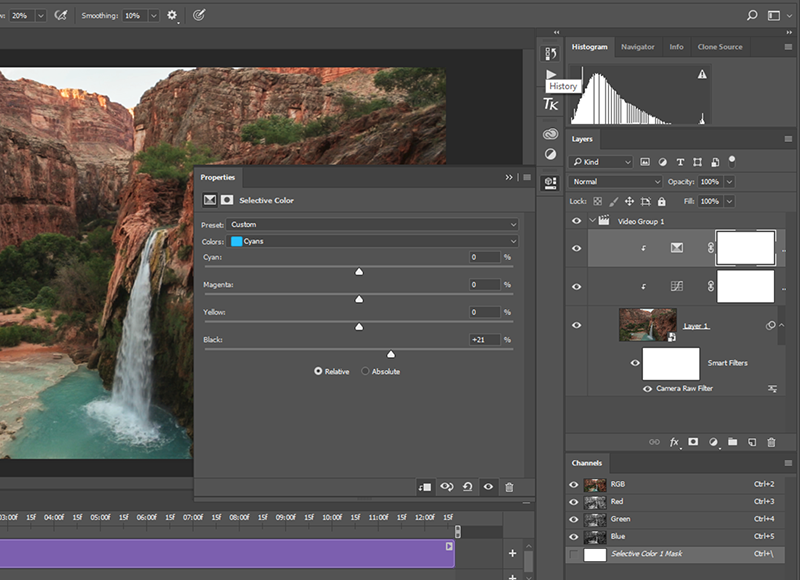
Similarly, I added a “Selective Color” layer to darken the cyan color in the water.
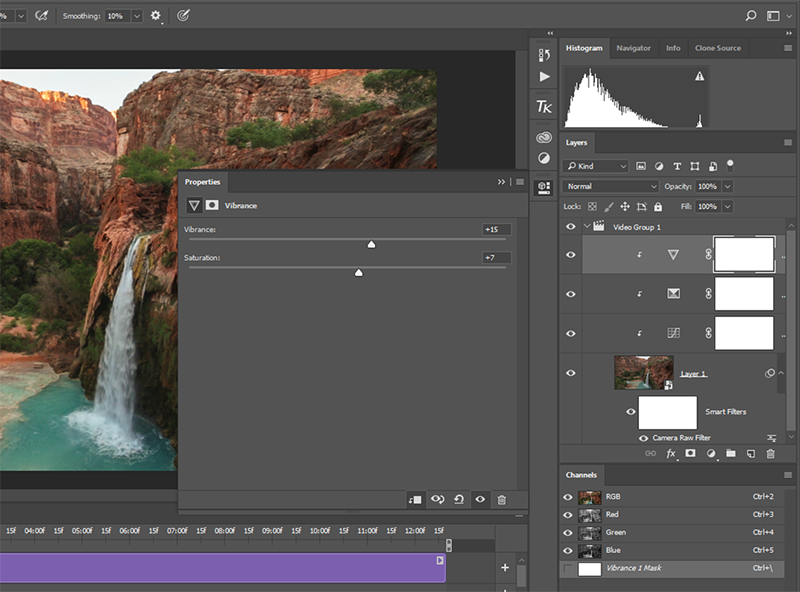
And some vibrance and saturation…
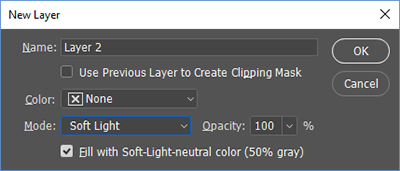
Because the camera is stationary for this video, I can add some special effect layers without causing any problems. The first thing I’ll do is create a soft-light layer so I can do some dodging and burning. Select the “Video Group 1” text in the Layer Pallet and then from the menu select “Layer ∙ New ∙ Layer” (or on a PC you can use the shift+Ctrl+N shortcut) to bring up the new layer dialog. Select the “Soft Light” mode and check the “Fill with Soft-Light-neutral color” box as shown below then click “OK”.
As you can see below, this creates the soft light layer within the video group. The trick is to move it outside the group so it applies to the entire video.
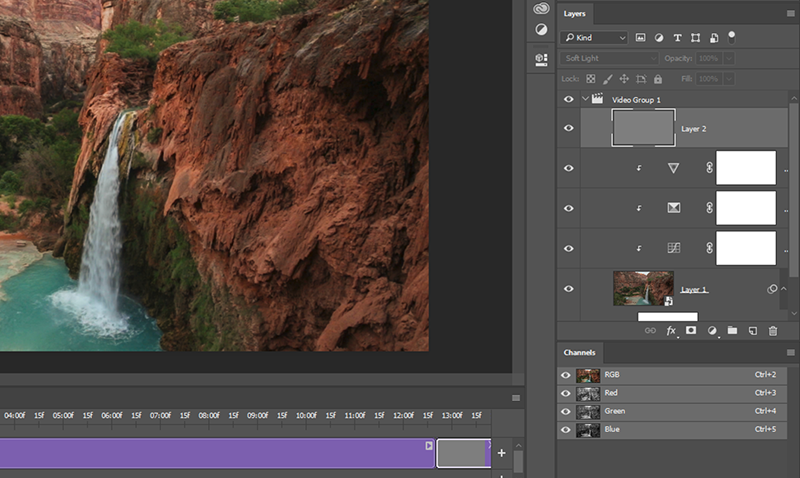
The first step is to drag the new layer outside (and above) the group in the Layer Pallet.
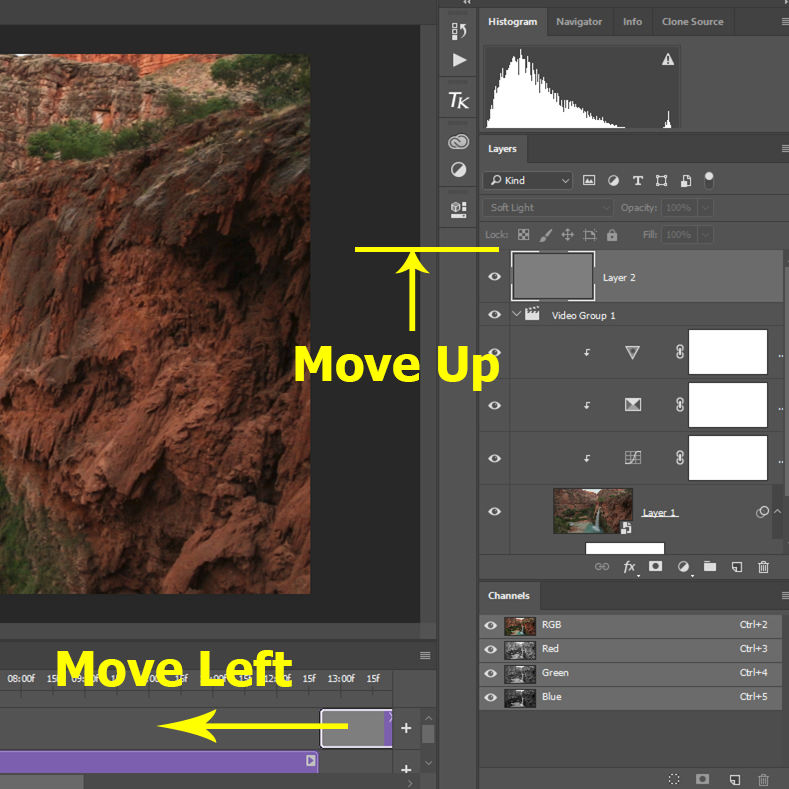
The next step is to go to the timeline view at the bottom and move the layer on top of the base video. You can just drag it into position and then adjust the beginning and end points by dragging them as well.
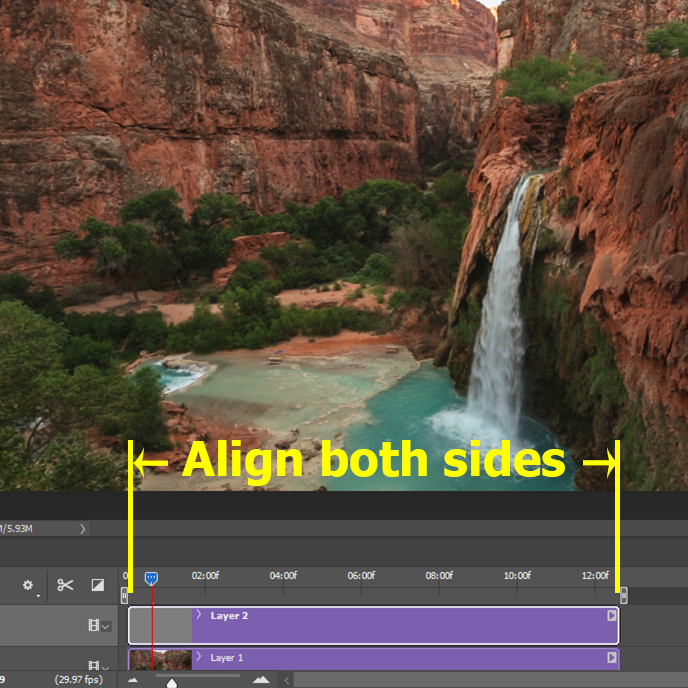
Now you can paint light colors into the soft light layer to lighten parts of the image (dodge) and dark colors to darken (burn) others. I painted some light yellows into the foliage, some light red highlights into the rock and then some black into the sky to darken it a little. No need to be too precise since this is a video and things are moving anyway.

Now if I wanted to add some glow, I can just click on the soft light layer (Layer 2) and then press Ctrl+Alt+Shift+E to create a composite layer as shown below. Like with the soft light layer, I need to adjust it in the timeline to line up with the rest of the video.
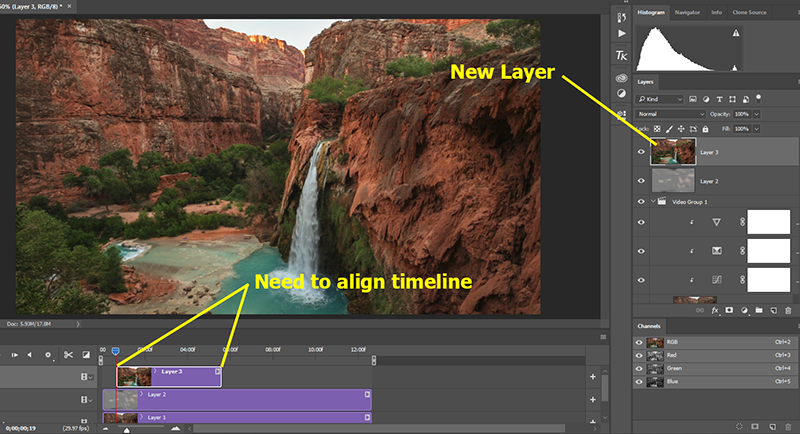
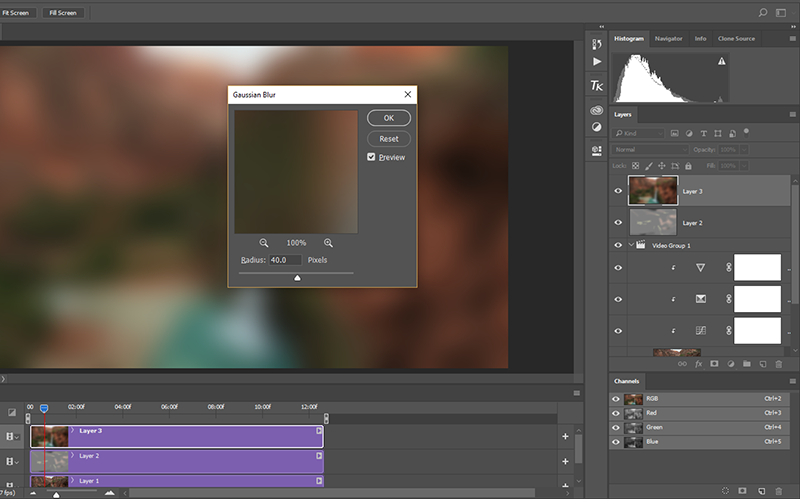
A fairly simply glow can be added by adding a gaussian blur to Layer 3…
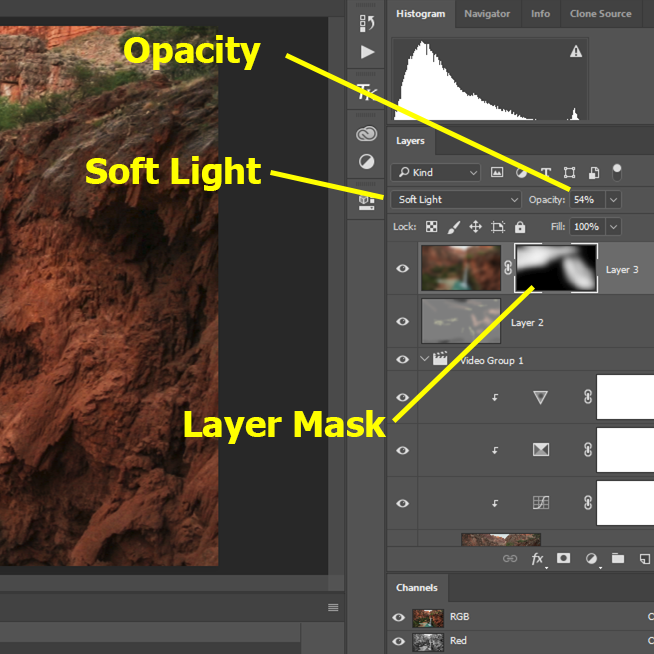
And then changing the blend mode to soft light. You can adjust the opacity of the layer to taste. In this case, I really only want to apply the blur to some of the red rock so I added a black layer mask and painted the effect into the areas where I wanted it with a white brush.
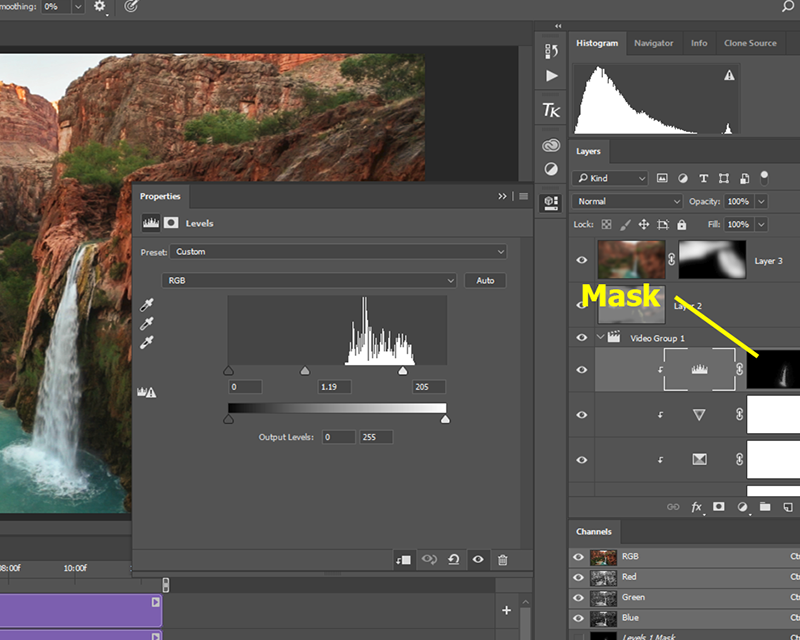
At this point I could be done, but I feel like the water in the falls is a little flat. I went back into the video group and created a new Levels layer to brighten and add contrast and then used a lights luminance mask to paint the effect into the waterfall.
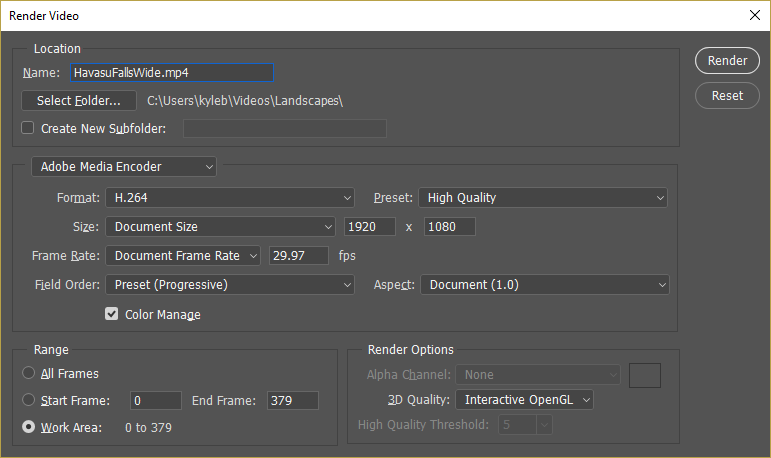
So now that I’m happy with the processing, I can export to video – either to stand alone or to join with other clips into a larger project. Simply select “File ∙ Export ∙ Render Video” to bring up the video dialog, name your file, and render. The settings below have worked fine for me at 1080p.
And there you go!
With this guide I’ll step through the processing of a video I captured at Havasu Falls in Arizona, showing how to adjust the shadows/highlights, colors, contrast, and saturation in a non-destructive manner as well as adding some special effects like dodging/burning and even some glow. This isn’t the only way to edit video in Photoshop, but hopefully seeing how you can perform these functions will give you some ideas how you can adapt your workflow to video as well.
The first step is to open the video file in Photoshop. I just right-click on the file and select “open with Photoshop”. As you can see below, the file looks very flat. In the layers panel (on the right) you can see that the video has been opened as a layer in a Video Group. A video timeline is available at the bottom of the screen. A slider at the bottom of the timeline (circled in yellow) lets you zoom the timeline so it better fills the screen. This isn’t critical for editing a single clip like this, but it can help you see things a little better.
The first step is to turn the video into a smart object. This will allow me to apply a Camera RAW filter (not normally available as a layer) in a manner that allows me to go back and adjust the settings later. Right click on the layer name in the pallet and select “Convert to Smart Object”.
Now you can select Layer 1 and from the menu select “Filter ∙ Camera Raw Filter” to bring up the equivalent of the adjustments you can make in Lightroom or Camera Raw (see below). In this case I adjusted the temperature and tint sliders to warm the scene and remove some of the green tint. I also reduced the highlights to get some color back into the sky and boosted the shadows a little. Finally I added some clarity as this isn’t easily replicated by the other tools in Photoshop.
Once I click OK I can see that Photoshop added a Smart Filter to the video (see below). If I decide I want to tweak the results a little, I can just double click on the “Camera RAW Filter” label under the smart filter and it brings the RAW dialog back.
As this image is a little flat, the first thing I’ll do is add a curve for some contrast adjustment. First click on the “Layer 1” Layer and then you can click on the half white/grey circle below it to bring up the layer choices and select “Curves”.
I added an S-curve to give me the contrast I wanted.
Similarly, I added a “Selective Color” layer to darken the cyan color in the water.
And some vibrance and saturation…
Because the camera is stationary for this video, I can add some special effect layers without causing any problems. The first thing I’ll do is create a soft-light layer so I can do some dodging and burning. Select the “Video Group 1” text in the Layer Pallet and then from the menu select “Layer ∙ New ∙ Layer” (or on a PC you can use the shift+Ctrl+N shortcut) to bring up the new layer dialog. Select the “Soft Light” mode and check the “Fill with Soft-Light-neutral color” box as shown below then click “OK”.
As you can see below, this creates the soft light layer within the video group. The trick is to move it outside the group so it applies to the entire video.
The first step is to drag the new layer outside (and above) the group in the Layer Pallet.
The next step is to go to the timeline view at the bottom and move the layer on top of the base video. You can just drag it into position and then adjust the beginning and end points by dragging them as well.
Now you can paint light colors into the soft light layer to lighten parts of the image (dodge) and dark colors to darken (burn) others. I painted some light yellows into the foliage, some light red highlights into the rock and then some black into the sky to darken it a little. No need to be too precise since this is a video and things are moving anyway.
Now if I wanted to add some glow, I can just click on the soft light layer (Layer 2) and then press Ctrl+Alt+Shift+E to create a composite layer as shown below. Like with the soft light layer, I need to adjust it in the timeline to line up with the rest of the video.
A fairly simply glow can be added by adding a gaussian blur to Layer 3…
And then changing the blend mode to soft light. You can adjust the opacity of the layer to taste. In this case, I really only want to apply the blur to some of the red rock so I added a black layer mask and painted the effect into the areas where I wanted it with a white brush.
At this point I could be done, but I feel like the water in the falls is a little flat. I went back into the video group and created a new Levels layer to brighten and add contrast and then used a lights luminance mask to paint the effect into the waterfall.
So now that I’m happy with the processing, I can export to video – either to stand alone or to join with other clips into a larger project. Simply select “File ∙ Export ∙ Render Video” to bring up the video dialog, name your file, and render. The settings below have worked fine for me at 1080p.
And there you go!

