Alex Vasile
Well-Known Member
I would like to introduce to you a free and open source photography app that I have been helping develop. It's called Burst Photo. Before I get your hopes too high, you should know it's only for macOS. It does:
The basic idea is very similar and many of the people on this forum i'm sure are already aware of, and it is image stacking. Very common in astrophotography. Some of you probably have experience doing this in photoshop with landscape, architecture, or still life. It's less common in other types of photos because of the difficulties (and tediousness) associated with aligning everything in the frame. The way Burst Photo handles this is by splitting each image into very small rectangles and then automatically aligning each of those rectangles. Something like this gif from our website:
This allows the approach to handle *significant* movement within a frame. And by significant, I mean people walking across the frame, cars driving, waves. Depending on how much movement there is in the scene, you may not be able to match each of the small squares, if that happens, then that square is not merges and you will end up with higher amounts of noise around the things that are moving.
The files you get out of it are regular DNGs. They will not have as much dynamic range as the 32-bit float DNGs, or EXR, or whatever other format your HDR software might output in. But, you will be able to process them in your regular workflow, just like any other raw file.
The effects are particularly striking on older or sub-full-frame sensors. For example this shot is from another contributor (Chris, who has done a lot of work on the app) is from a 12-bit M4/3 camera. The top left shows the scene, and the exposure you would need to not clip your highlights. I encourage you to pixel peek at the crops below to look at the differences in the result.

Some more technical features:
How I personally use it:
Try it for yourself
Camera Support:
Alternatives:
Disadvantages:
If you read all the way to the end, here's one last example. It's a 1:1 crop from Rawdigger (so no sharpness or noise reduction applied). I took it with my a7III, handheld with a 100mm macro lens at ISO 20,000. I recommend you follow the link and check it out at 100%.
- Noise reduction: burst of photos all with the same exposure.
- HDR + noise reduction: exposure bracketed shot (e.g. -2, 0, +2EV)
- Synthetic long exposure: you can also turn off the aligning of images and do a temporal average (including HDR support).
- Breathing new life it your old cameras: If a single photo does not have the dynamic range or noise levels of current cameras, a burst of them will. Lets you hold onto your gear longer, unless you want an excuse to buy new gear
") .
.
The basic idea is very similar and many of the people on this forum i'm sure are already aware of, and it is image stacking. Very common in astrophotography. Some of you probably have experience doing this in photoshop with landscape, architecture, or still life. It's less common in other types of photos because of the difficulties (and tediousness) associated with aligning everything in the frame. The way Burst Photo handles this is by splitting each image into very small rectangles and then automatically aligning each of those rectangles. Something like this gif from our website:
This allows the approach to handle *significant* movement within a frame. And by significant, I mean people walking across the frame, cars driving, waves. Depending on how much movement there is in the scene, you may not be able to match each of the small squares, if that happens, then that square is not merges and you will end up with higher amounts of noise around the things that are moving.
The files you get out of it are regular DNGs. They will not have as much dynamic range as the 32-bit float DNGs, or EXR, or whatever other format your HDR software might output in. But, you will be able to process them in your regular workflow, just like any other raw file.
The effects are particularly striking on older or sub-full-frame sensors. For example this shot is from another contributor (Chris, who has done a lot of work on the app) is from a 12-bit M4/3 camera. The top left shows the scene, and the exposure you would need to not clip your highlights. I encourage you to pixel peek at the crops below to look at the differences in the result.
Some more technical features:
- Raw-in-raw-out without demosaicing.
- Raw files are small and fit right back into your regular workflow.
- Optional 16-bit output to retain as much information as possible.
- My sony has 14-bit raws, but my ancient canon (and my foveon camera) have 8-bit raws. Choosing 16-bit for the canon has significant improvements in noise and dynamic range.
- See the impact on the shadows in this comparison. Again for a 12-bit M4/3s camera. The only difference between them is whether to use 12 bits or 16 bits for the output raw.
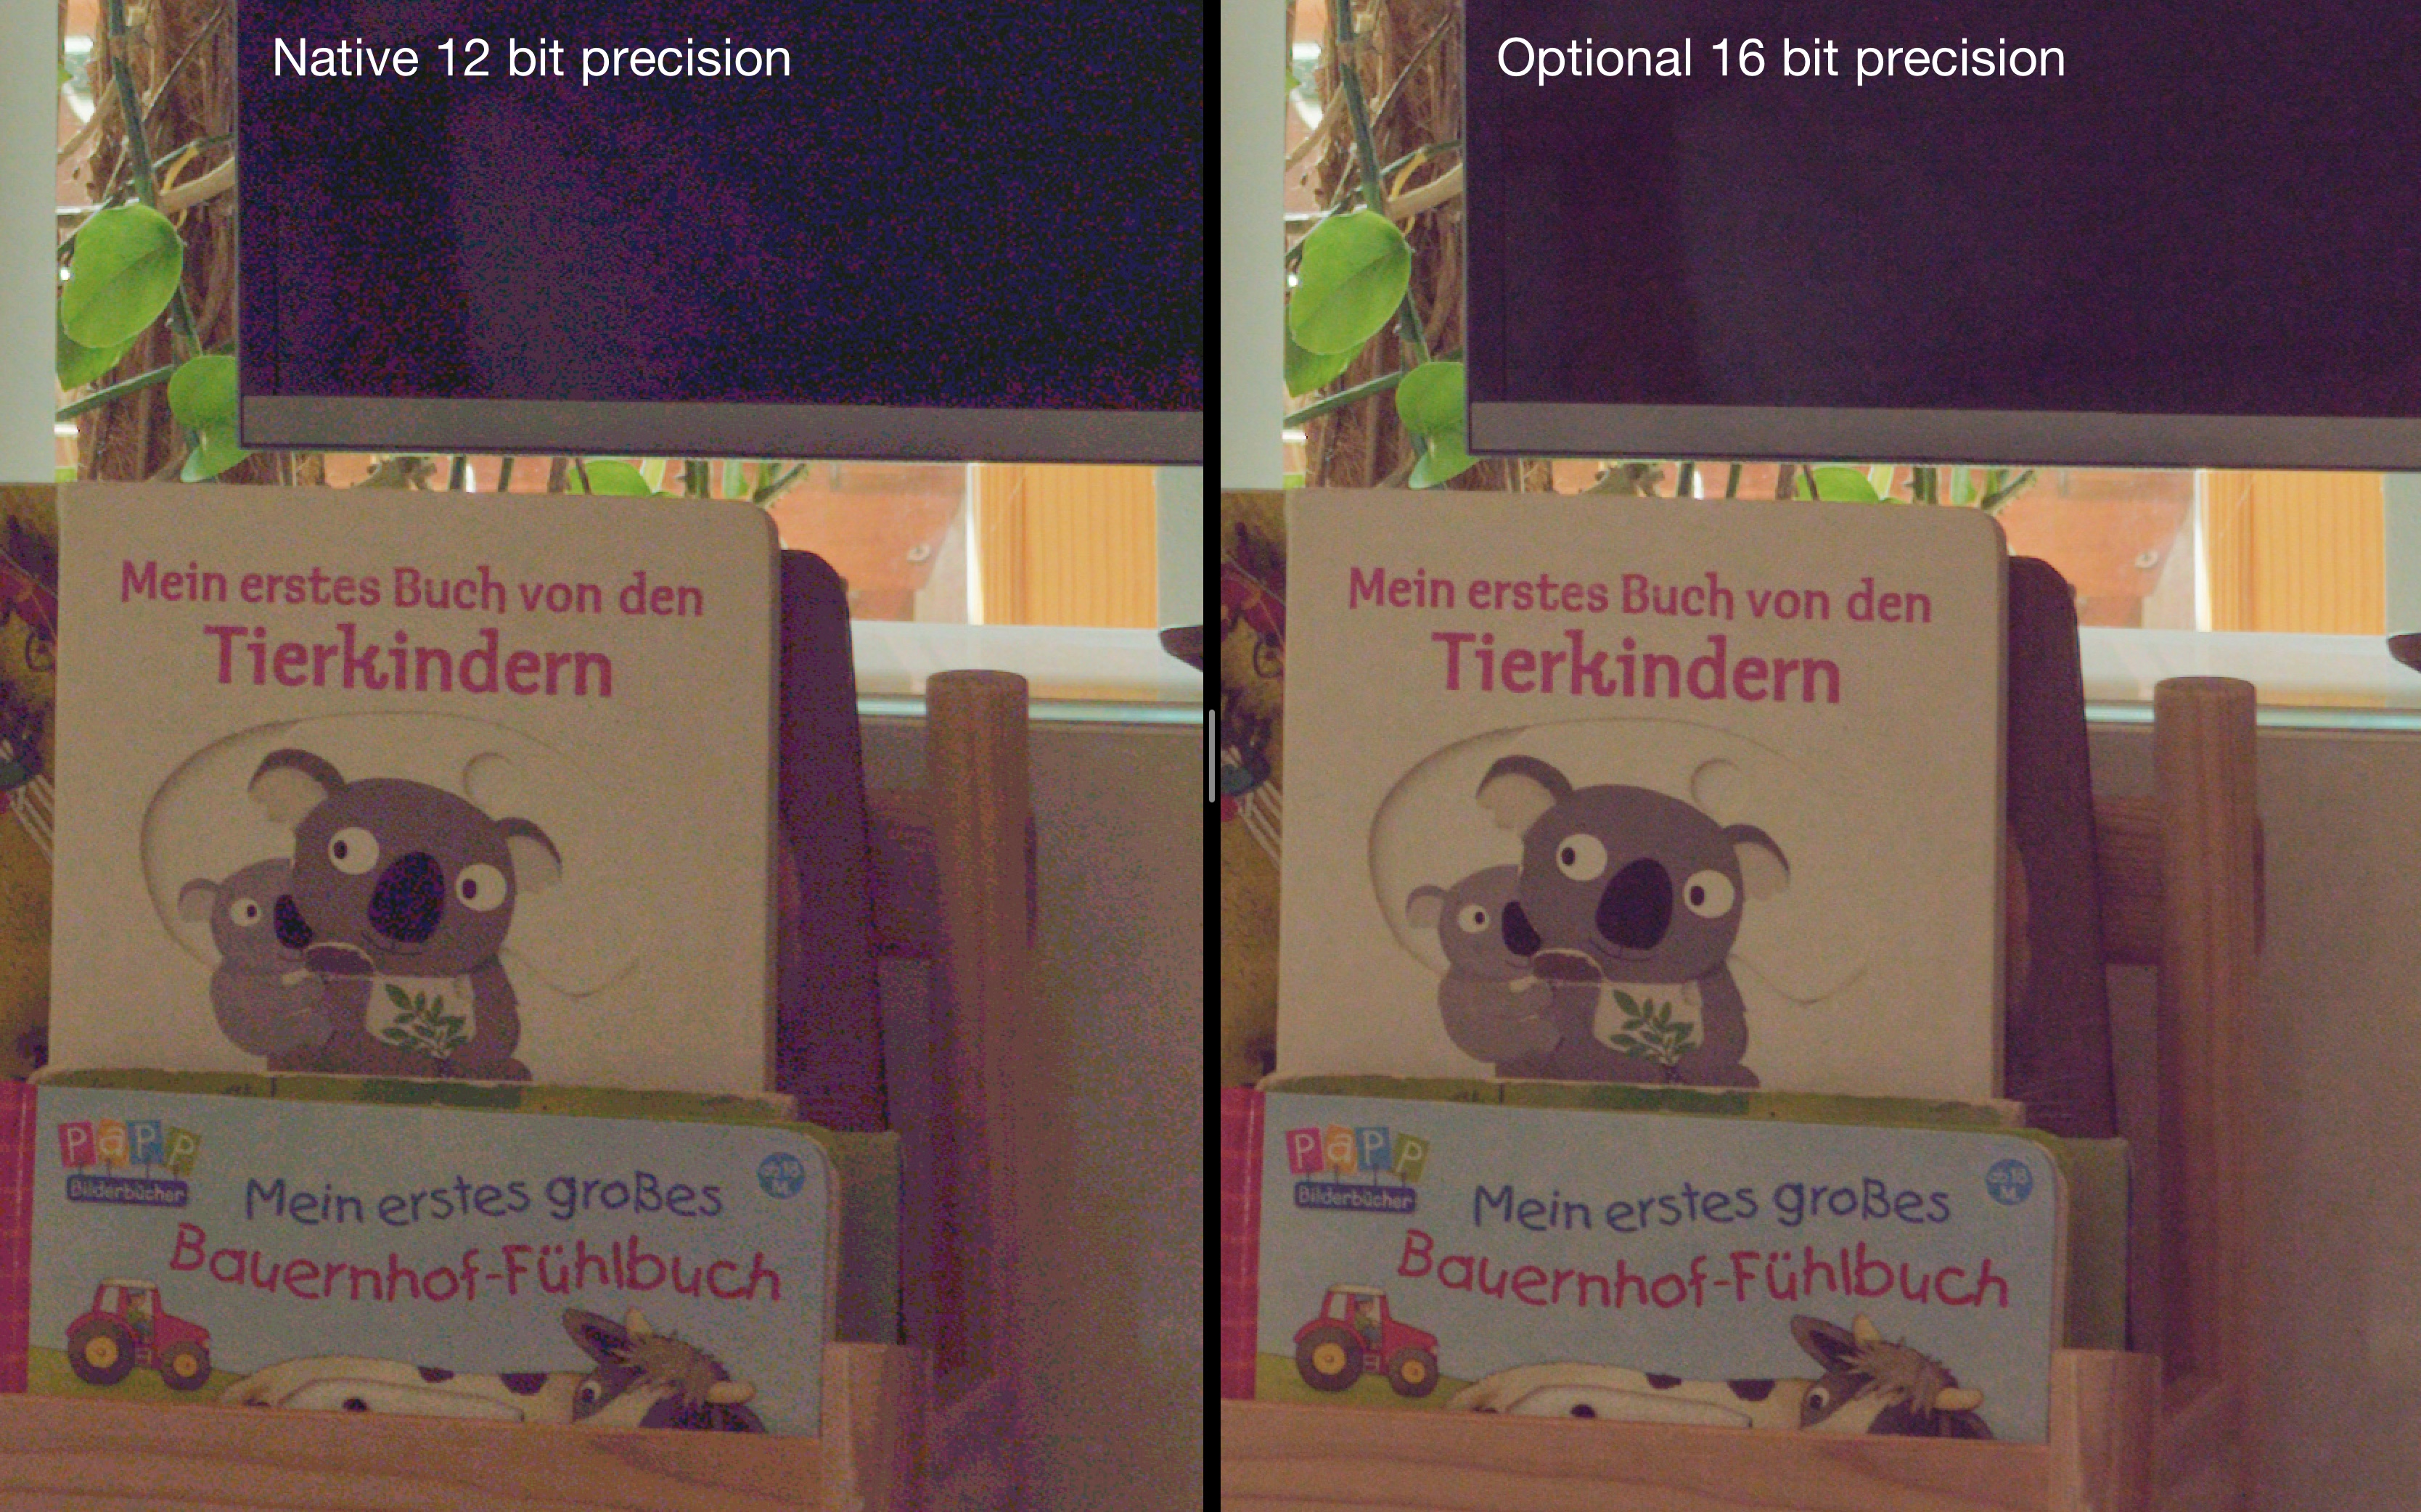
- Optional tone mapping of the output raw file. Compare the images in the bottom row from above
- This will lift the shadows and reduce the quantization effects caused the raw files using integers (whole numbers) to represent the information.
- It will compress the highlights to get more information into the file than you could with a linear response curve.
- This tonal compression will preserve more of the dynamic range of the burst when saving it back into a raw file. This will require extra processing on your part in whatever raw convertor you use.
- Mild Hotpixel-correction is applied to remove some hotpixels without affecting stars for astrophotography.
How I personally use it:
- I find it especially useful for indoor events where I'm already shooting bursts in order to capture the right moment. I find that merging the photos gives me, on an a7III, the equivalent noise reduction of dropping my ISO >2 stops. The actual amount depends on how much movement there is between the frames, and how much sharpness you are willing to sacrifice. I then apply regular noise reduction in my raw editor (Capture One).
- Lets me shoot with a full electronic shutter (which for my Sony drops me from 14-bit raws to 12-bit raws) in high contrast scenes by doing an exposure bracketed burst.
Try it for yourself
- If your camera supports an automatic exposure bracket consider turning it on to gather some images. This will provide the most amount of benefit. Otherwise set it to burst and take a few photos. The closer together you take the images the better the noise reduction will be.
- Open the application and change settings if you'd like.
- Drag and drop the raw files into the application.
- The raw files must be converted to .dng. If you have the adobe dng convertor application installed in the default location, Burst Photo will find it and convert the files for you behind the scenes. If you do not, you will have to download the convertor, or convert them yourself.
- When it's finished, the raw files are saved in Pictures/Burst Photo.
Camera Support:
- Bayers sensor camera
- X-Trans sensor cameras (Beta, not all features available. If you have X-Trans cameras and want to contribute some photos, I would love to hear from you.)
- Foveon (Not **yet**, but soon. If you have a Foveon camera, you know how badly it needs noise reduction)
- Demosaiced images (Not Yet)
Alternatives:
- Capture One supports producing HDR images in its newer version. The resulting image will have less noise and be a 16-bit DNG. However I have my gripes with it:
- It really struggles with movement within the frame. But, if there is very little movement, the resulting image is sharper than Burst Photo.
- It does not handle clipped highlights or many images well. I find that has a tendency to create ugly artifacts, especially around highlights (specular reflections, car headlights, bright windows, etc).
- It produces massive raw files which I have not been able to open in all software.
- My sony a7III files go from 49MB .ARWs to ~160MB .DNGs This is because Capture One demosaics the images (so the DNG has 2x more data for green, 3x for blue, and 3x for red).
- The 16-bit images coming out of Burst Photo on the other hand are ~29MB.
- DxO PhotoLabs:
- Does not support HDR merging. I think there are plugins for it, but I'm not willing to buy one and test (I could not find only if it supported).
- They do have fairly strong noise reduction algorithms, especially their deep prime. But I am personally skeptical of applying anything machine learning related to images since that extra information that they provide is not from the image itself but hallucinated by the software. Burst Photo is using only information contained in the photos.
- Aurora HDR:
- The version I have does not do RAW-in-RAW-out
- The version I have does not handle movement within the frame very well
- Photoshop
- You could stack the images yourself with a median filter, but this requires an extra step and the result is not a raw file.
Disadvantages:
- macOS only. None of the original developers used a windows/linux computer for our photo workflow so it was written to be mac only. Theoretically it could be moved to windows/linux, but that would require a completely rewrite, which none of us have any plans on doing.
- In exchange for the ability to handle this movement, you will lose some amount of sharpness. How much depends on the burst and the settings you choose, but it's within the user's control.
- Because the software lets the user set how aggressive to be about noise reduction, you can get situations where you end up with artifacts caused by the software being unable to merge the tiles. These artifacts are not always noticeable unless you're pixel peeping. But they can always be removed by using a less aggressive setting for the noise reduction.
If you read all the way to the end, here's one last example. It's a 1:1 crop from Rawdigger (so no sharpness or noise reduction applied). I took it with my a7III, handheld with a 100mm macro lens at ISO 20,000. I recommend you follow the link and check it out at 100%.
Last edited: