I really enjoyed the frozen bubbles that @Alisa and @Trent Watts posted. So I thought that it looked like fun and that I would give it a try.
I looked at some tutorials to figure out the solution that is used. It seems like mostly everyone uses the same basic recipe. Some slight variations in proportions, but basically they are all the same except some include sugar and other don't. I went with Alisa's recipe.
1 Cup Warm Water
2.5 tablespoons of Corn Syrup
2.5 tablespoons of dish soap (I used clear)
2 tablespoons of sugar
The 2 ways I saw the bubbles being made were either with blowing through a straw dipped into the solution, or squeezing a small squeezable bottle.
Also while many tutorials stated it just needed to be below freezing, Alisa had told me her sweet spot was 12 degrees F. This morning, it was 15 degrees F, so I went with that as it looks like warmer weather is in the forecast. I did notice that as the temperature got closer to 32 degrees, less and less crystals were forming. So I would say 12 to 15 degrees is the target.
When photographing the bubble, the goal is to blur the background, so you want to set your camera to shoot wide open, or close to it.
I found a large cooking pot of my daughters and tipped it upside down, and then grabbed a bucket of snow and dumped it on the bucket.
I had 3 main stumbling points this morning.
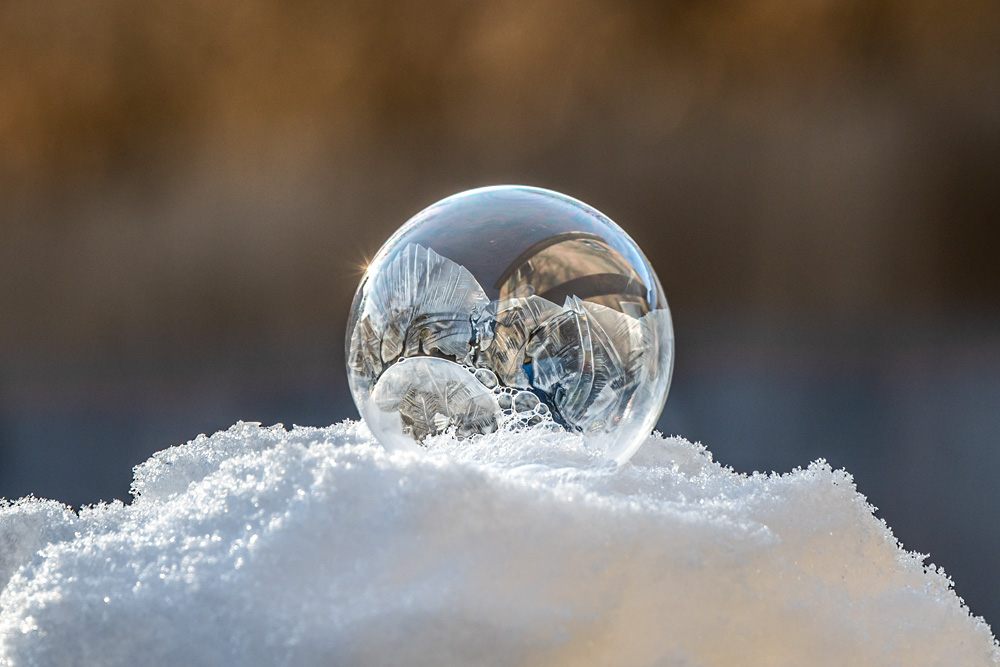
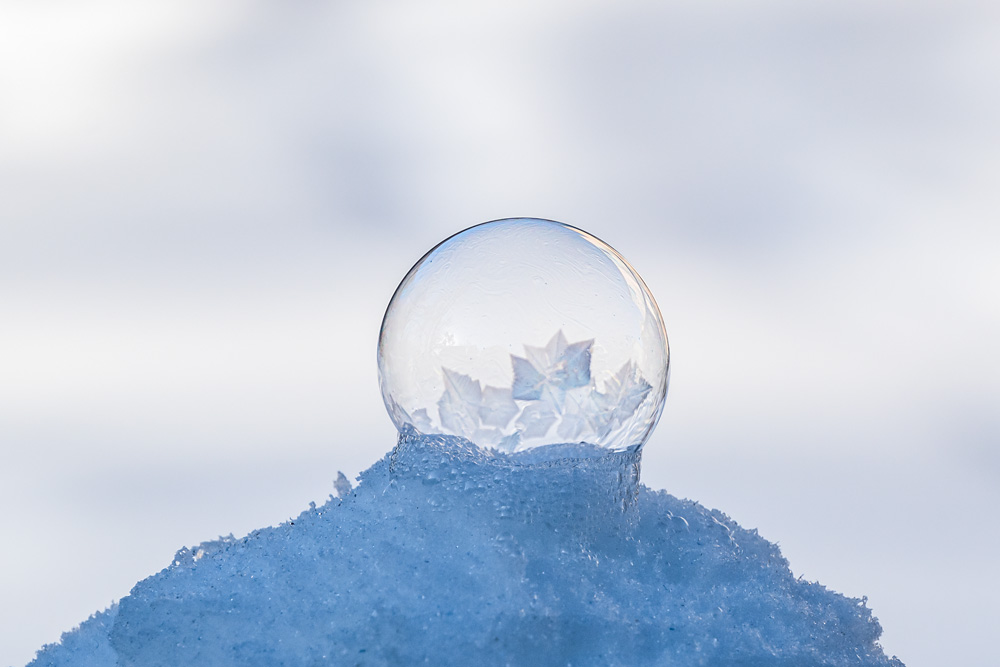
1st, I didn't think about how the bubble would reflect what was behind me, where I was setup with my camera on a tripod. I got great crystals in the bubbles at first, but then I quickly noticed most of the bubble was reflecting my daughters house in it. So then I moved down off of her 2nd story patio, out into her backyard. I still got some reflections but only on the edges.
2nd, I was shooting almost wide open so as to blur the background, but different shapes and colors still showed up as a distraction. After a bit of trial and error, I was able to set up my camera to aim in a way that there was snow in the background as opposed to fences, etc...
3rd, was the shooting angle. The tutorials mentioned having the sun behind the bubble, but that didn't work for me where the sun was directly behind the bubble. I ended up setting my camera so that it was 90 degrees to the side as the bubble was being lit. I think directly behind is better, with the neighbors trees and house, it was hard as the shadows kept changing as the sun kept rising.
Something else I noticed, is that the crystals inside the bubble seemed to form on the side facing the sun, which was the backside of the bubble from my cameras position. Not sure if that was just by luck or what?
Also, the very slightest of wind will pop the bubble. I had barely any breeze at all, and the bubble was dancing a bit.
That's my journey so far. I have a long way to go to catch up to Alisa and Trent, but once it gets cold again (Warmer weather for the next week), I am going to try again, maybe setting up at a local park.
All comments are welcome,
Jim
#1 - From my first location on the 2nd story deck
#2 - Down in the backyard itself.
I looked at some tutorials to figure out the solution that is used. It seems like mostly everyone uses the same basic recipe. Some slight variations in proportions, but basically they are all the same except some include sugar and other don't. I went with Alisa's recipe.
1 Cup Warm Water
2.5 tablespoons of Corn Syrup
2.5 tablespoons of dish soap (I used clear)
2 tablespoons of sugar
The 2 ways I saw the bubbles being made were either with blowing through a straw dipped into the solution, or squeezing a small squeezable bottle.
Also while many tutorials stated it just needed to be below freezing, Alisa had told me her sweet spot was 12 degrees F. This morning, it was 15 degrees F, so I went with that as it looks like warmer weather is in the forecast. I did notice that as the temperature got closer to 32 degrees, less and less crystals were forming. So I would say 12 to 15 degrees is the target.
When photographing the bubble, the goal is to blur the background, so you want to set your camera to shoot wide open, or close to it.
I found a large cooking pot of my daughters and tipped it upside down, and then grabbed a bucket of snow and dumped it on the bucket.
I had 3 main stumbling points this morning.
1st, I didn't think about how the bubble would reflect what was behind me, where I was setup with my camera on a tripod. I got great crystals in the bubbles at first, but then I quickly noticed most of the bubble was reflecting my daughters house in it. So then I moved down off of her 2nd story patio, out into her backyard. I still got some reflections but only on the edges.
2nd, I was shooting almost wide open so as to blur the background, but different shapes and colors still showed up as a distraction. After a bit of trial and error, I was able to set up my camera to aim in a way that there was snow in the background as opposed to fences, etc...
3rd, was the shooting angle. The tutorials mentioned having the sun behind the bubble, but that didn't work for me where the sun was directly behind the bubble. I ended up setting my camera so that it was 90 degrees to the side as the bubble was being lit. I think directly behind is better, with the neighbors trees and house, it was hard as the shadows kept changing as the sun kept rising.
Something else I noticed, is that the crystals inside the bubble seemed to form on the side facing the sun, which was the backside of the bubble from my cameras position. Not sure if that was just by luck or what?
Also, the very slightest of wind will pop the bubble. I had barely any breeze at all, and the bubble was dancing a bit.
That's my journey so far. I have a long way to go to catch up to Alisa and Trent, but once it gets cold again (Warmer weather for the next week), I am going to try again, maybe setting up at a local park.
All comments are welcome,
Jim
#1 - From my first location on the 2nd story deck
#2 - Down in the backyard itself.

")